
テーブルビューのリストの中から任意の文字列を検索できる「SearchBar」について
TODOリストアプリが完成してるのが前提なので見てない人は以下記事参照↓

完成形はこちら
SearchBarに検索したい文字を入力するとテーブルビューの表示が変わります
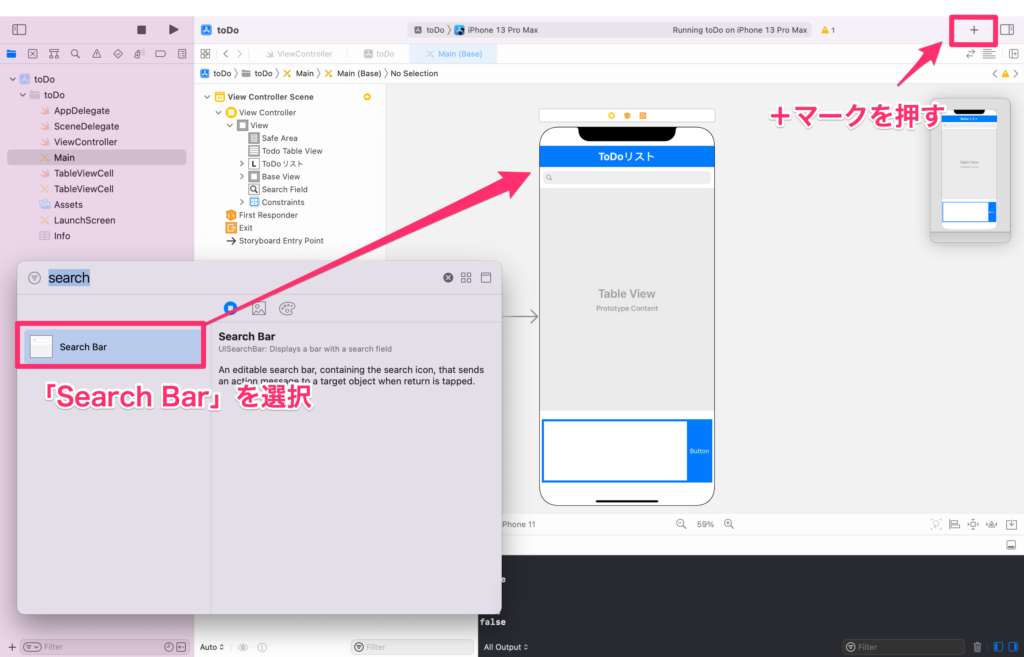
Main.storyboardの編集
SearchBarを画面上部に配置するだけです。
ViewController.swiftの編集
コード全文です
import UIKit

class ViewController: UIViewController,UITableViewDelegate,UITableViewDataSource {

    @IBOutlet weak var addTextView: UITextView!
    @IBOutlet weak var button: UIButton!
    @IBOutlet weak var todoTableView: UITableView!
    @IBOutlet weak var baseView: UIView!
    //サーチバーをひも付け
    @IBOutlet weak var searchField: UISearchBar!

    //ユーザーデフォルトのインスタンス宣言
    let userDefaults = UserDefaults.standard
    //chatsという名前の空の配列
    var chats:[String] = []

    //SearchBar用に空の変数を準備 下の2つ
    var searchResults:[String] = []
    var isSearching = false


    override func viewDidLoad() {
        super.viewDidLoad()

        //    searchField.enablesReturnKeyAutomatically = false
        //tableviewの線を消す
        todoTableView.tableFooterView = UIView()
        //これ書くと、最下部のextensionとつながる
        addTextView.delegate = self

        //起動時はボタンを押せないようにしておく
        button.isEnabled = false
        button.setTitleColor(UIColor.systemGray , for: .normal)

        //キーボード入力処理を受け取るコマンド "showKeyboard"
        NotificationCenter.default.addObserver(self, selector: #selector(showKeyboard), name: UIResponder.keyboardWillShowNotification, object: nil)
        //キーボードを隠す処理を受け取るコマンド "hideKeyboart"
        NotificationCenter.default.addObserver(self, selector: #selector(hideKeyboard), name: UIResponder.keyboardWillHideNotification, object: nil)

        //キーボードを下に引っ張って消すやつ これはなかなか重要
        let swipDownGesture = UISwipeGestureRecognizer(target: self, action: #selector(dismissKeyboard))
        swipDownGesture.direction = .down
        self.view.addGestureRecognizer(swipDownGesture)

        //アプリ起動時にtableViewを読み込む
        todoTableView.register(UINib(nibName: "TableViewCell", bundle: nil), forCellReuseIdentifier: "CustomCell")

        //起動時にユーザーデフォルトを呼び出す
        if let arryTodoList = userDefaults.array(forKey: "todoList") as? [String] {
            chats.append(contentsOf: arryTodoList)
        }

    }

    //cell高さを可変にする もしcellにtextviewを使用してる場合"scrolling Enable"のチェックを外すこと!
    func tableView(_ tableView: UITableView, heightForRowAt indexPath: IndexPath) -> CGFloat {
        todoTableView.estimatedRowHeight = 50
        return UITableView.automaticDimension
    }

    //セルの個数を指定
    func tableView(_ tableView: UITableView, numberOfRowsInSection section: Int) -> Int {

        if isSearching == true {
            return searchResults.count
        } else {
            return chats.count
        }
    }
    //セルはTableViewCellから情報取ってくる
    func tableView(_ tableView: UITableView, cellForRowAt indexPath: IndexPath) -> UITableViewCell {
        let cell = tableView.dequeueReusableCell(withIdentifier: "CustomCell", for: indexPath) as! TableViewCell
        if isSearching {
            cell.textView.text = searchResults[indexPath.row]
        } else {
            cell.textView.text = chats[indexPath.row]
        }
        return cell
    }

    //cellを削除するやつ
    func tableView(_ tableView: UITableView, commit editingStyle: UITableViewCell.EditingStyle, forRowAt indexPath: IndexPath) {
        if editingStyle == .delete {
            chats.remove(at: indexPath.row)
            todoTableView.deleteRows(at: [indexPath], with: .fade)
            userDefaults.set(chats, forKey: "todoList")

        }
    }


    //キーボードを消すやつ
    override func touchesBegan(_ touches: Set<UITouch>, with event: UIEvent?) {
        self.view.endEditing(true)
    }

    //キーボードを表示するときに画面をずらす動作 UIViewを指定すると上手く動く
    @objc func showKeyboard(notification: Notification) {

        let keyboardFrame = (notification.userInfo![UIResponder.keyboardFrameEndUserInfoKey] as AnyObject).cgRectValue

        guard let keyboardMinY = keyboardFrame?.minY else{ return }
        let MaxY = baseView.frame.maxY
        let distance = MaxY - keyboardMinY + 200  // + 100  //この"10"が画面タテ方向への移動量
        let transform = CGAffineTransform(translationX: 0, y: -distance)

        UIView.animate(withDuration: 0.5, delay: 0, usingSpringWithDamping: 1, initialSpringVelocity: 1, options: []
                       , animations: {
            self.view.transform = transform})

    }

    //キーボード消える時に画面の位置を元に戻す動作
    @objc func hideKeyboard() {
        UIView.animate(withDuration: 0.5, delay: 0, usingSpringWithDamping: 1, initialSpringVelocity: 1, options: []
                       , animations: {
            self.view.transform = .identity})
    }


    //buttonを押した時の動作
    @IBAction func button(_ sender: Any) {

        if searchField.text == "" {
            self.chats.insert(addTextView.text!, at: 0)
            self.todoTableView.insertRows(at: [IndexPath(row: 0, section: 0)], with: UITableView.RowAnimation.right)

            //ユーザーデフォルトに保存
            self.userDefaults.set(self.chats, forKey: "todoList")
            //TextViewに空文字を入れて空白にする
            self.addTextView.text = ""
            //keyboardを隠す
            self.dismissKeyboard()

            print(UserDefaults.standard.dictionaryRepresentation().filter { $0.key.hasPrefix("todoList") })


        } else {
            button.isEnabled = false
        }
        todoTableView.reloadData()
    }

    //buttonが押されたらキーボードを消す
    @objc func dismissKeyboard() {
        self.view.endEditing(true)
    }

}
//textViewに、テキストがあるか無いかを判別してる
extension ViewController: UITextViewDelegate {

    func textViewDidChangeSelection(_ textView: UITextView) {
        let addTextViewEmpty = addTextView.text?.isEmpty ?? true
        if addTextViewEmpty  {
            button.isEnabled = false
            button.setTitleColor(UIColor.systemGray , for: .normal)
        } else {
            button.isEnabled = true
            button.setTitleColor(UIColor.white , for: .normal)

        }
    }
}

//UISearcbarの処理を記述
extension ViewController: UISearchBarDelegate {

    //入力直後に検索が反映される
    func searchBar(_ searchBar: UISearchBar, textDidChange searchText: String) {

        if searchField.text == "" {
            isSearching = false
            todoTableView.reloadData()
            print(isSearching)
        } else {
            searchResults = chats.filter({$0.lowercased().prefix(searchText.count) == searchText.lowercased()})
            isSearching = true
            todoTableView.reloadData()
            print(isSearching)
        }
    }
    //サーチバーで決定ボタンを押した時の動作(決定ボタンで検索したい時はこっちを使用 今回未使用)
    func searchBarCancelButtonClicked(_ searchBar: UISearchBar) {
        isSearching = false
        searchField.text = ""
        todoTableView.reloadData()
        print(isSearching)
    }
}
過去記事のTODOアプリのコードに対して、サーチバー追加後に変更した部位は以下。詳細は説明しませんが、サーチバーに文字が入力された直後に検索できるコードになってます。
//サーチバーをひも付け
    @IBOutlet weak var searchField: UISearchBar!
//SearchBar用に空の変数を準備 下の2つ
var searchResults:[String] = []
var isSearching = false //セルの個数を指定
func tableView(_ tableView: UITableView, numberOfRowsInSection section: Int) -> Int {
if isSearching == true {
return searchResults.count
} else {
return chats.count
}
}
//セルはTableViewCellから情報取ってくる
func tableView(_ tableView: UITableView, cellForRowAt indexPath: IndexPath) -> UITableViewCell {
let cell = tableView.dequeueReusableCell(withIdentifier: "CustomCell", for: indexPath) as! TableViewCell
if isSearching {
cell.textView.text = searchResults[indexPath.row]
} else {
cell.textView.text = chats[indexPath.row]
}
return cell
}//サーチバーの処理を記述
extension ViewController: UISearchBarDelegate {
//入力直後に検索が反映される
func searchBar(_ searchBar: UISearchBar, textDidChange searchText: String) {
if searchField.text == "" {
isSearching = false
todoTableView.reloadData()
print(isSearching)
} else {
searchResults = chats.filter({$0.lowercased().prefix(searchText.count) == searchText.lowercased()})
isSearching = true
todoTableView.reloadData()
print(isSearching)
}
}
//サーチバーで決定ボタンを押した時の動作(決定ボタンで検索したい時はこっちを使用 今回未使用)
func searchBarCancelButtonClicked(_ searchBar: UISearchBar) {
isSearching = false
searchField.text = ""
todoTableView.reloadData()
print(isSearching)
}
}おしまい(´∀`)
コメント