
シンプルなTODOアプリです。
完成形はこれ
シンプルなTODOアプリです。テキストビューに文字を入力してボタン押すだけ。データはユーザーデフォルトに保存するのでアプリ閉じてもデータ残ります(TODOリストの削除機能も付けてます)
TableViewCell編集
テーブルビューの配置方法は過去記事を参照

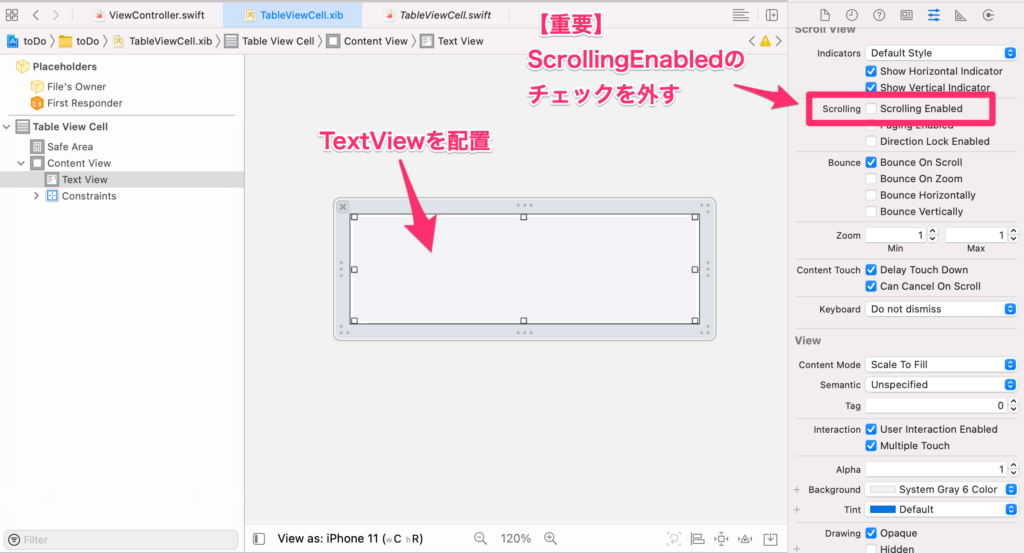
まずはTableViewCell.xibファイルを編集。TextViewを1つ配置します。この時、Scrolling Enabledのチェックを外してください。
TableViewCell.swiftファイルのコードは以下。TextViewを1つひも付けしただけです。
import UIKit

class TableViewCell: UITableViewCell {

    @IBOutlet weak var textView: UITextView!


    override func awakeFromNib() {
        super.awakeFromNib()
        // Initialization code
    }

    override func setSelected(_ selected: Bool, animated: Bool) {
        super.setSelected(selected, animated: animated)

        // Configure the view for the selected state
    }

}
Main.storyboard編集
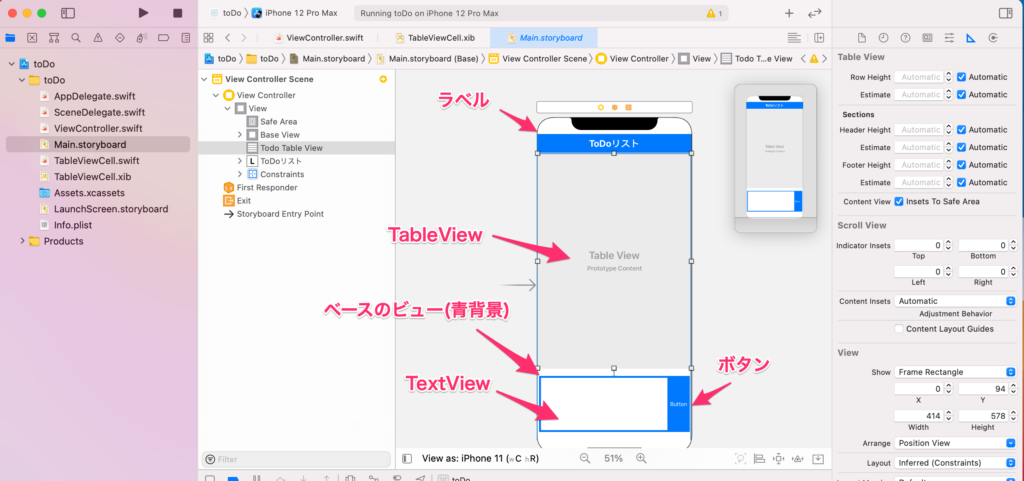
細かい説明はしませんが、画像のように配置します。Viewの中に、TextViewとボタンを配置しておくと、後々移動させる時やTextViewサイズを変更する時に効率的です。
TextViewの使い方は過去記事を参照

ViewController.swift編集
こんな感じです。キーボードの処理に関するコードが非常に多いです。
import UIKit

class ViewController: UIViewController,UITableViewDelegate,UITableViewDataSource {

    @IBOutlet weak var addTextView: UITextView!
    @IBOutlet weak var button: UIButton!
    @IBOutlet weak var todoTableView: UITableView!
    @IBOutlet weak var baseView: UIView!

    //ユーザーデフォルトのインスタンス宣言
    let userDefaults = UserDefaults.standard
    //chatsという名前の空の配列
    var chats:[String] = []


    override func viewDidLoad() {
        super.viewDidLoad()

        //tableviewの線を消す
        todoTableView.tableFooterView = UIView()
        //これ書くと、最下部のextensionとつながる
        addTextView.delegate = self

        //起動時はボタンを押せないようにしておく
        button.isEnabled = false
        button.setTitleColor(UIColor.systemGray , for: .normal)

        //キーボード入力処理を受け取るコマンド "showKeyboard"
        NotificationCenter.default.addObserver(self, selector: #selector(showKeyboard), name: UIResponder.keyboardWillShowNotification, object: nil)
        //キーボードを隠す処理を受け取るコマンド "hideKeyboart"
        NotificationCenter.default.addObserver(self, selector: #selector(hideKeyboard), name: UIResponder.keyboardWillHideNotification, object: nil)

        //キーボードを下に引っ張って消すやつ これはなかなか重要
        let swipDownGesture = UISwipeGestureRecognizer(target: self, action: #selector(dismissKeyboard))
        swipDownGesture.direction = .down
        self.view.addGestureRecognizer(swipDownGesture)

        //アプリ起動時にtableViewを読み込む
        todoTableView.register(UINib(nibName: "TableViewCell", bundle: nil), forCellReuseIdentifier: "CustomCell")

        //起動時にユーザーデフォルトを呼び出す
        if let arryTodoList = userDefaults.array(forKey: "todoList") as? [String] {
            chats.append(contentsOf: arryTodoList)
        }

    }

    //cell高さを可変にする もしcellにtextviewを使用してる場合"scrolling Enable"のチェックを外すこと!
    func tableView(_ tableView: UITableView, heightForRowAt indexPath: IndexPath) -> CGFloat {
        todoTableView.estimatedRowHeight = 50
        return UITableView.automaticDimension
    }

    //セルの個数を指定
    func tableView(_ tableView: UITableView, numberOfRowsInSection section: Int) -> Int {
        return chats.count
    }
    //セルはTableViewCellから情報取ってくる
    func tableView(_ tableView: UITableView, cellForRowAt indexPath: IndexPath) -> UITableViewCell {
        let cell = tableView.dequeueReusableCell(withIdentifier: "CustomCell", for: indexPath) as! TableViewCell
        let chat = chats[indexPath.row]
        cell.textView.text = chat

        return cell
    }

    //cellを削除するやつ
    func tableView(_ tableView: UITableView, commit editingStyle: UITableViewCell.EditingStyle, forRowAt indexPath: IndexPath) {
        if editingStyle == .delete {
            chats.remove(at: indexPath.row)
            todoTableView.deleteRows(at: [indexPath], with: .fade)
            userDefaults.set(chats, forKey: "todoList")

        }
    }

    //キーボードを消すやつ
    override func touchesBegan(_ touches: Set<UITouch>, with event: UIEvent?) {
        self.view.endEditing(true)
    }

    //キーボードを表示するときに画面をずらす動作 UIViewを指定すると上手く動く
    @objc func showKeyboard(notification: Notification) {
        let keyboardFrame = (notification.userInfo![UIResponder.keyboardFrameEndUserInfoKey] as AnyObject).cgRectValue

        guard let keyboardMinY = keyboardFrame?.minY else{ return }
        let MaxY = baseView.frame.maxY
        let distance = MaxY - keyboardMinY + 10  //この"10"が画面タテ方向への移動量
        let transform = CGAffineTransform(translationX: 0, y: -distance)

        UIView.animate(withDuration: 0.5, delay: 0, usingSpringWithDamping: 1, initialSpringVelocity: 1, options: []
                       , animations: {
                        self.view.transform = transform})
    }

    //キーボード消える時に画面の位置を元に戻す動作
    @objc func hideKeyboard() {
        UIView.animate(withDuration: 0.5, delay: 0, usingSpringWithDamping: 1, initialSpringVelocity: 1, options: []
                       , animations: {
                        self.view.transform = .identity})
    }


    //buttonを押した時の動作
    @IBAction func button(_ sender: Any) {

        self.chats.insert(addTextView.text!, at: 0)
        self.todoTableView.insertRows(at: [IndexPath(row: 0, section: 0)], with: UITableView.RowAnimation.right)

        //ユーザーデフォルトに保存
        self.userDefaults.set(self.chats, forKey: "todoList")
        //TextViewに空文字を入れて空白にする
        self.addTextView.text = ""
        //keyboardを隠す
        self.dismissKeyboard()

        print(UserDefaults.standard.dictionaryRepresentation().filter { $0.key.hasPrefix("todoList") })

    }

    //buttonが押されたらキーボードを消す
    @objc func dismissKeyboard() {
        self.view.endEditing(true)
    }
}
//textViewに、テキストがあるか無いかを判別してる
extension ViewController: UITextViewDelegate {

    func textViewDidChangeSelection(_ textView: UITextView) {
        let addTextViewEmpty = addTextView.text?.isEmpty ?? true
        if addTextViewEmpty  {
            button.isEnabled = false
            button.setTitleColor(UIColor.systemGray , for: .normal)
        } else {
            button.isEnabled = true
            button.setTitleColor(UIColor.white , for: .normal)

        }
    }
}
サーチバーの設置
サーチバーは必須では無いですが、文字検索用にサーチバーを使用したい方は以下記事参照

参考になった方は👍ボタンお願いします ↓
コメント