
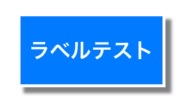
こんな感じのラベル。以下のコードで実現できます。ラベル枠の「角丸」と「影付き」は同時に設定でき無いので注意が必要です。
import UIKit

class ViewController: UIViewController {

    @IBOutlet weak var labelTest: UILabel!

    override func viewDidLoad() {
        super.viewDidLoad()


        //ラベルにテキスト入力
        labelTest.text = "ラベルテスト"

        //文字の色
        labelTest.textColor = .white

        //ラベル書式 フォント設定
        labelTest.font = UIFont.boldSystemFont(ofSize: 15.0)

        //その他のフォント、フォント指定なしは以下
        // labelTest.font = UIFont.systemFont(ofSize: 20.0)
        // labelTest.font = UIFont.italicSystemFont(ofSize: 20.0)
        // labelTest.font = label.font.withSize(20)

        //ラベル背景色
        labelTest.backgroundColor = .link

        //ラベルの枠線
        labelTest.layer.borderWidth = 2.0
        labelTest.layer.borderColor = UIColor.white.cgColor

        //ラベル枠線の角丸と影は同時にできない・・・
        // labelTest.layer.cornerRadius = 10

        //角丸を使うとき clipsToBoundsを"True"にする
        labelTest.clipsToBounds = false

        //ラベル文字に影をつける
        labelTest.layer.shadowColor = UIColor.black.cgColor
        labelTest.layer.shadowOpacity = 0.5
        labelTest.layer.shadowRadius = 1.0
        labelTest.layer.shadowOffset = CGSize(width: 4, height: 4)

        //ラベルの文字サイズを最適化
        labelTest.adjustsFontSizeToFitWidth = true

        //ラベルの文字を中央に寄せる
        labelTest.textAlignment = .center

        //ラベル内の行数 "0"で複数行
        labelTest.numberOfLines = 0

    }

}
コメント